Saturday, January 29, 2011

Circle Blog January Monthly Challenge

The challenge at the circle blog was to scraplift a project that was a past blog project, use two cricut cuts and two sponsor products. I saw a video on the circle blog showing how to make a shaker card by Shantaie Fowler for Halloween. Well, I needed to make a birthday card and loved the idea of a shaker card...so here is my interpretation!
I used American Crafts everyday bonjour paper (the flower base) and the solid colors are from Bazzill Basics Paper, Tropical Breeze (blue) and Guava Sensation (pink). The ribbon behind the Happy Birthday sentiment is American Crafts.
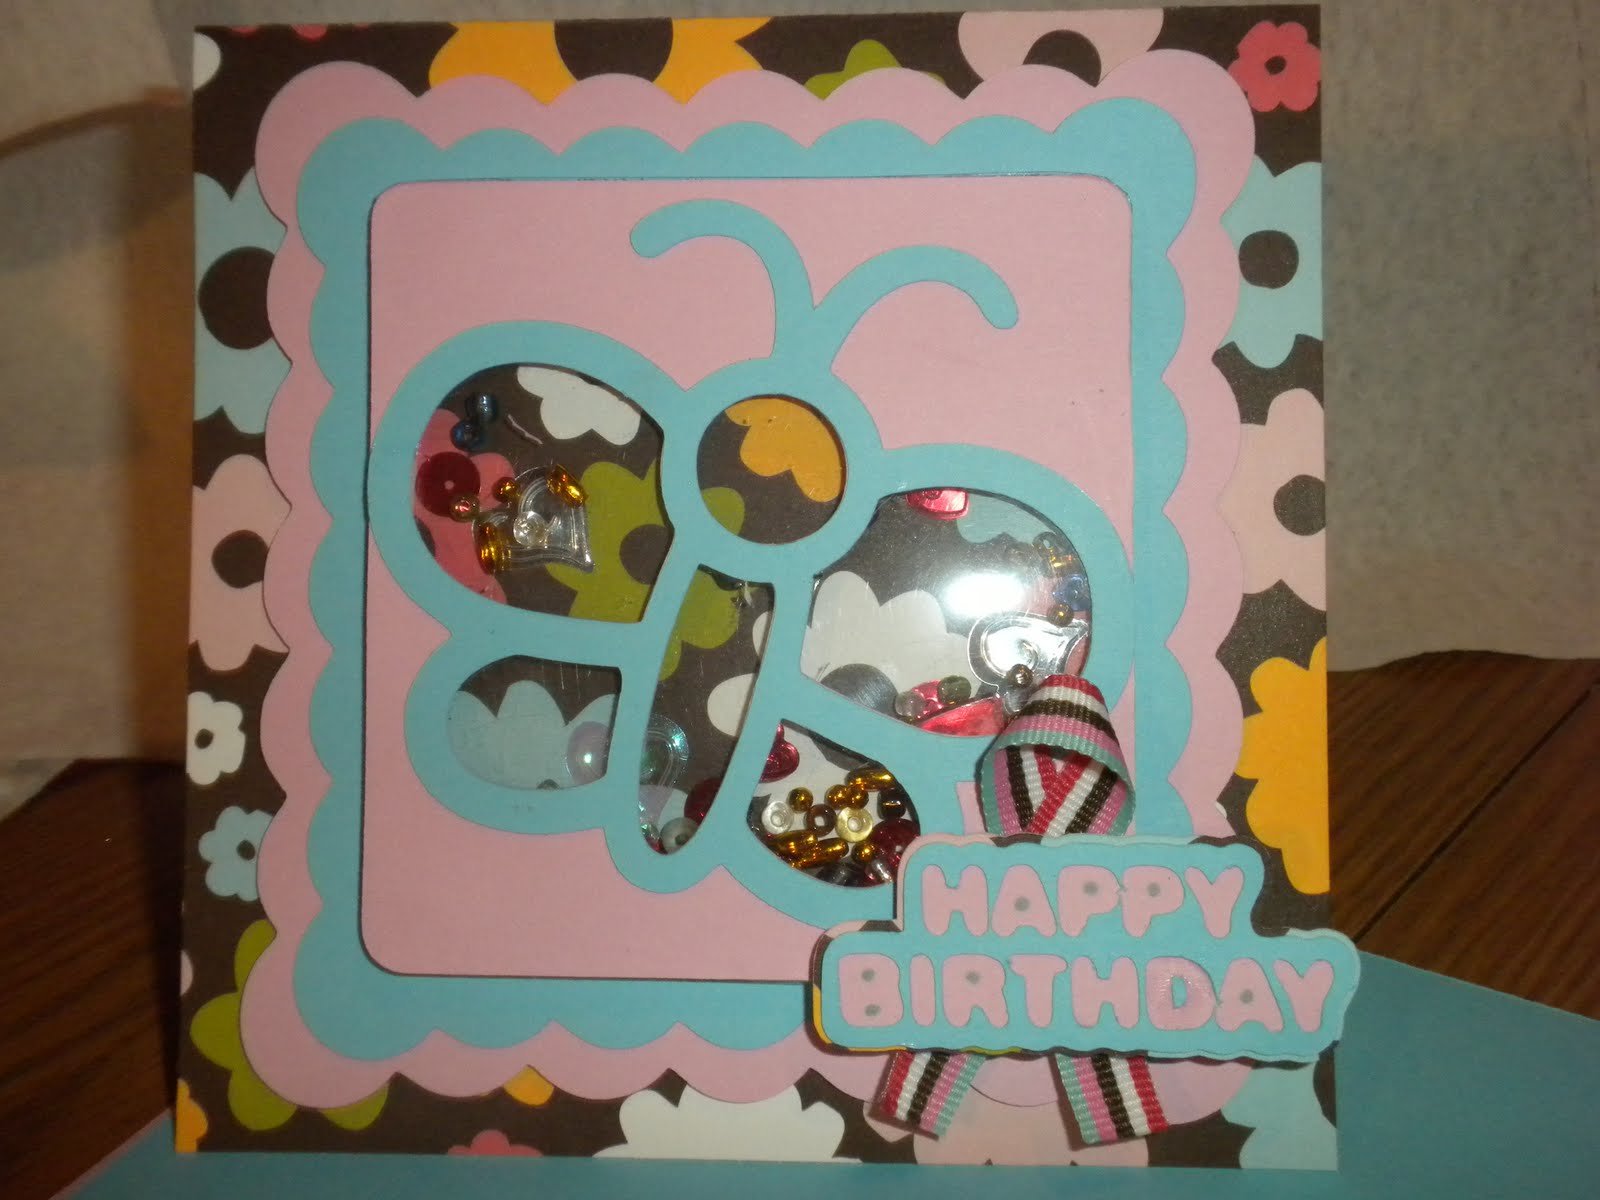
The card base is 5 1/2 square and the scalloped squares were altered on my gypsy using the frame cut from Accent Essentials. I cut two, one at 5 inches and a smaller one at 4 1/2, both had the inside square cut hidden with the hide contour button. The butterfly cut is from Hello Kitty Greetings cut at 3.73 by 3.4 inches. One butterfly was welded to the square, this was the cut used to glue onto the clear plastic (I recycled cartridge packaging but I believe Bazzill sells some wonderful clear acetate). The Happy Birthday sentiment was cut from Hello Kitty Greetings, height was 1 inch.
The shaker pieces were a miss-match of items I had. Some of the sequin was from Valentine's day card kits found at Target dollar spot last year, and some of the seed beads came from my DD stash of beading supplies.
I used dimensionals on the birthday sentiment to add drama, I felt with the floral paper as the shadow just didn't make it stand out enough. I don't have to worry about mailing the card, I plan to hand deliver it to my aunt in March when we meet for a ladies trip to SC. Over all, I am very pleased with how it came out, and will have to give myself a pep talk to actually give it to my aunt instead of keeping it for myself!

Weekly Circle blog challenge #18

The challenge is to only use one cart that originally came with your cricut machine and at least three different cuts.

I chose to use Accent essentials. I used my gypsy to weld the boarder pieces. I also used the shadow feature of the frame to make the large solid square layers and adjusted the sizes with the gypsy to make the fit. The smaller solid squares are the inside cuts from the frames. I used the leaf cut shadow to make it a solid leaf and then the posy flowers are in red. One of the posies I used a water mark ink to show the different circles. I use shadow of the flower to make the blue dimensional flowers.


Papers: Sprinkles Leisure Suit from Luxe designs
Green #2 from Die Cuts With a View
Pastel Blue from The Paper Company
All cuts from Accent Essentials, designed on the gypsy cut on the cricut
Elegance Black Glitter pillow stickers (black swirls) from K&Company
brads made with the I-top tool from Imaginesce
fabulous - rhinestones words from me&my big ideas.
The blue flowers were made using the shadow cut of the posy flower then with scissors I cut a spiral into the center, make the inside smaller, glued the inside edge of the spiral to the outside of the now cupped up flower until used up the length of paper.

The center brads are made with the i-top. I used a water mark ink pad and a background stamp to add variety before punching out the paper to make the brads.

Tuesday, January 25, 2011

Flaunt It Fridays - Bear in Can

A fun blog that does a weekly challenge, Flaunt It Fridays, is featuring the bear peeking
out of a garbage can from the Give a Hoot cartridge. I made this card with my sister in mind. She lives on the East Coast, I live in the Mid West. We plan to see each other for a ladies get-a-way in early March so I thought this would be fun to send her.
So how did I make this?...well all the papers are scraps from my stash. In fact, the dark brown is some textured paper I have had for years (over 15 years!) that at one point was used as a folder for my teaching files. All the bear and can cuts were done at 3 inches. The background layer was run through the cuttlebug using the leafy branch folder. The orange ribbon I picked up at Joannes after Halloween on sale but I don't recall the brand. I hand wrote the words using a Bic Mark*It fine point marker in the color Harvest Orange. (love the set, so many colors it was easy to find just the right match!) I added the eyes and noise with the dark brown marker from the same Bic Mark*It set and the mouth is part of the die cut. I inked the edge of the green background paper lightly with ColorBox fluid chalk in tangerine.
Inside the card I decorated with the same light green scrap paper using the Fiskars Elegance border punch, and lightly inked the fancy edge using the tangerine ColorBox chalk. The words "can't wait to see you" are written with the same Harvest Orange Bic Mark*It marker on a punch out of the scrap paper. I used the Fiskars cameo appearance squeeze punch and again, inked the edges with the tangerine chalk.

Now to find an envelope and write a brief note to my sis. I might even make it in time for today mail pick-up!

Saturday, January 15, 2011

Thank you Joy's Life!

 Here is the beginning of jazzing up the bumpy vase.  
It was super easy to color the raised dots with the Bic Mark-it markers
I was a super lucky super friend over at the Joy's Life website.  I love Joy's site because of her super sense of humor and crafty, creative superpowers!  Just before Christmas she had a fun, crafty, creative filled 12 days of Christmas event and give a ways were involved.   I was blessed to receive Bic Mark-it markers - terrific permanent markers in fine tip and super fine.
Yes, I actually won two different sets of the colorful tools from Joy's Life!  I really wanted to try coloring on glass and the Bic Mark-its were just the thing!  I have a set of wine glasses just waiting to be decorated, but until I decide on the design...I tried the markers on this vase I picked up at Ikea.  I couldn't leave the vase empty so I fired up my Cricut and made some paper flowers using bamboo skewers as the stems.  I didn't have any of the decorative stones/glass to fill the bottom so decided to vary the height of the flowers by tying ribbons on the "stems" to act as stoppers at the top of the vase.
I made this a couple weeks ago, meant to gift it to a friend last weekend and forgot to take it with me to our meet-up.  so now it sits in my kitchen reminding met o get to the craft room and create!  In case you are wondering about the color choice of orange and green, well it was created with Fiskateers and Cricuteers in mind!  Now I wish I could remember what cartridges have the flowers, I used my gypsy, didn't save the mat layout, but my best guess is Accent Essentials.  The solid paper colors are coordinations and the pattern, who knows, they were in my scrap stash.  Ribbon is a wild guess, some it think are from the Target dollar spot.

Hello Kitty

I used a composition notebook and added the Hello Kitty with the airplane to decorate it.  Today it was sent off in the mail to my DD for a bit of a pick-me-up package.